What is the DOM?
The Document Object Model (DOM) is the center of any web app. The DOM is the bridge between JavaScript and the display of the HTML and CSS. It could be argued that JavaScript’s sole purpose is to manipulate the DOM. The ability of JavaScript to change HTML/CSS and respond to user events through the DOM is what makes modern web apps possible.
The Document Object Model (DOM) is a programming interface for HTML and XML documents. It provides a structured representation of the document (a tree) and it defines a way that the structure can be accessed from programs so that they can change the document structure, style and content.
LabVIEW DOM
LabVIEW Front Panels also have a Document Object Model, but it is hidden in layers of Property Nodes. The DOM can be created by carefully crawling through the Property Nodes of all the controls on a Front Panel and assembling the properties into a single document. This document can be passed to JavaScript and then turned into HTML/CSS representations of the Front Panel controls.
JSON
Outside of the web browser the DOM is represented in a format called JSON [Wiki]. The JSON format is text based and conveniently mimics the DOM format, with a similar hierarchy and key/value pairs. JavaScript can convert JSON objects into DOM objects and back again. If we can create a JSON object in LabVIEW that represents the Front Panel Controls, then we can recreate that front panel in a web browser.
Creating the LabVIEW DOM
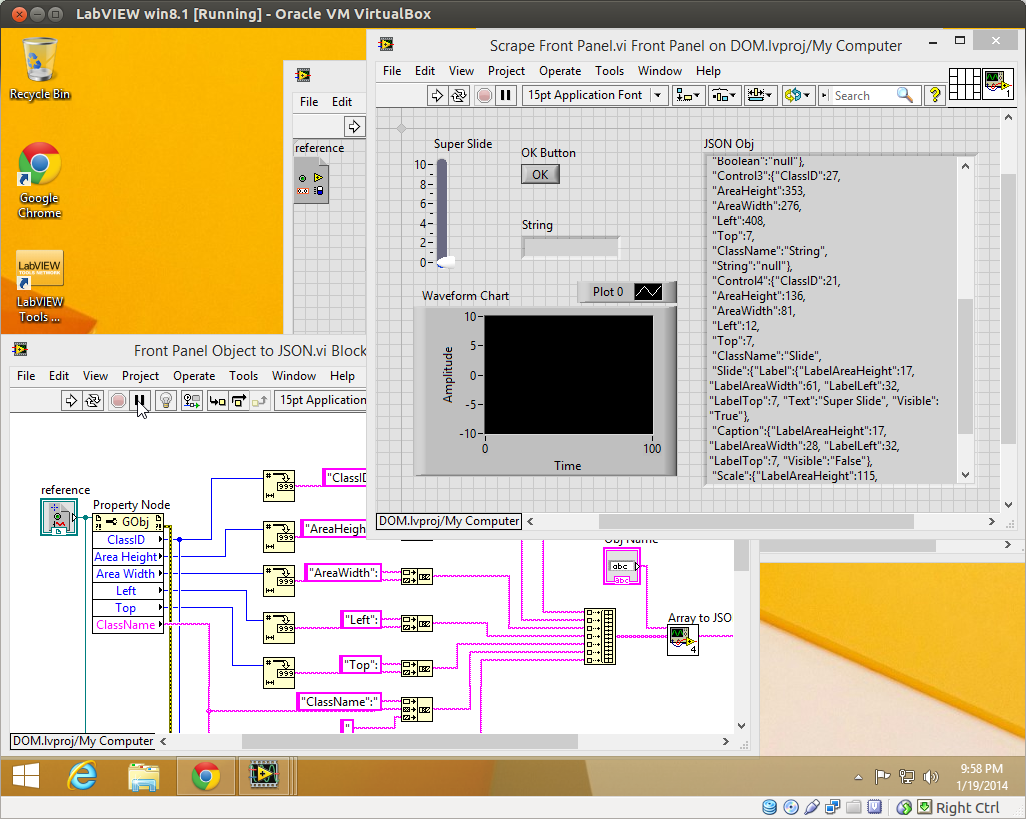
Extracting the DOM from a LabVIEW program is tedious. I have created a simple LabVIEW program that starts with the current VI reference, gets the array of front panel control references, extracts the properties of each of the controls and stores them in a JSON object. All the front panel controls share common properties such as height and width. Each type of control has further properties specific to that class. (For the OOP LabVIEW programmers this could be a good exercise.) I prefer the direct method and have added a case structure with a case for each of the control types and logic to convert the unique properties to JSON. When the program completes the output is a JSON string with the all the properties of all the front panel controls.
Sample JSON for a LabVIEW Front Panel Vertical Progress Bar
 {"Control4":{
   "ClassID":21,
   "AreaHeight":136,
   "AreaWidth":81,
   "Left":12,
   "Top":7,
   "ClassName":"Slide",
   "Slide":{
     "Label":{
         "LabelAreaHeight":17,
         "LabelAreaWidth":61,
         "LabelLeft":32,
         "LabelTop":7,
         "Text":"Super Slide",
         "Visible":"True"},

   "Caption":{
     "LabelAreaHeight":17,
     "LabelAreaWidth":28,
     "LabelLeft":32,
     "LabelTop":7,
     "Visible":"False"},

   "Scale":{
     "LabelAreaHeight":115,
     "LabelAreaWidth":20,
     "LabelLeft":12,
     "LabelTop":28,
     "Increment":2.000000,
     "Maximum":10.000000,
     "Minimum":0.000000,
     "MinorInc":1.000000,
     "RngStart":0.000000,
     "Visible":"True"}
    }
  }
}
To check the correctness of the JSON format I copied the output JSON and pasted it into an online JSON editor. The online editor arranges the JSON into drop down lists for each front panel object. The next step is to pass this JSON object through a LabVIEW Web Service to a JavaScript program that will translate the JSON into HTML and CSS to recreate the LabVIEW front panel in a web browser running on a PC, iPad, iPhone, tablet, etc.

Running a LabVIEW front panel on an iPad or web browser is done by assembling all the properties of the LabVIEW front panel controls into a JSON object, sending that object to an iPad app or web browser, then reading the JSON object and creating HTML elements with CSS styling that recreates the LabVIEW front panel. Through LabVIEW Web Services it is then possible to pass control states and data between the iPad and the LabVIEW program to keep the two front panels in-sync.